Also, sorry if this is so long. I was trying to make it easy to follow but thorough, but it ended up being kind of long. For those that are comfortable with networking. Here's the setup:
* Tomato Firmware on compatible Routers
* Picture of where I placed the Routers
* The setup I used as a google spreadsheet
Setting up a Wireless Network in your Meetinghouse using WDS for less than $100
Summary: With some inexpensive hardware and free, open-source firmware, you can set up a WDS network in your building. Here's how I did it this weekend.
Materials Needed:
- Four WRT54G Routers v1-v4 (or another compatible router with Tomato firmware) (e.g. We are using the following: WRT54GL v1.1; WRT54G v1, WRT54G v2.2, WRT54G v1.1)
- I found a few of these on my local craigslist for $20 each and one on ebay for $21 after shipping
- Make sure you get a version that is compatible with the Tomato firmware (ask the seller beforehand for the version number on the sticker on the bottom. If they don't know the version number, get the Serial Number, S/N, and look up the version number here or here.)
- An ethernet cable (for testing and flashing the firmware)
Part 1: Put Tomato Firmware on your router
- Download the Tomato Firmware: http://www.polarcloud.com/tomato
- Unzip it and read the "readme.htm"
- Assuming you purchased Linksys WRT54G routers, the instructions are, "Connect your computer to the router with the ethernet cable > Log In to your router > Go to Administration > Firmware Upgrade > Browse > Choose the correct .bin file > Click Okay" and wait for your router to reboot.
- However, please read the readme file. If the instructions aren't followed properly you can ruin the router (e.g., if you upload the wrong .bin file).
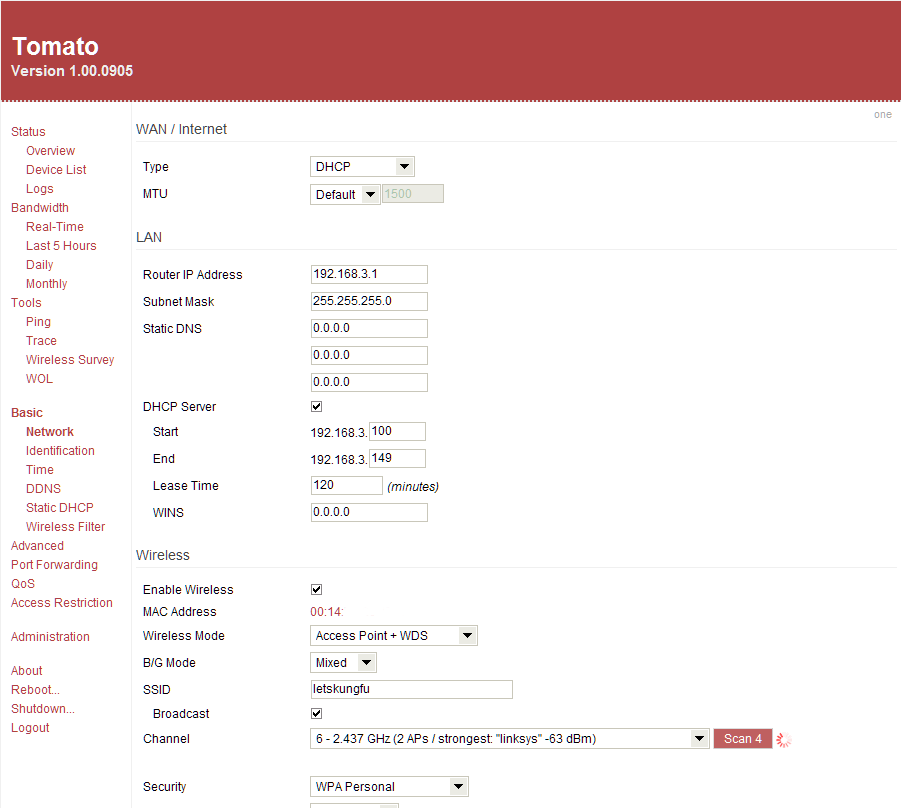
- Congratulations! You should now have the tomato firmware on your router. It should look something like this image.
- If you are having trouble logging in, try "root" as the username and "admin" as the password. If that doesn't work, you can reset your router by holding down the reset button for 15-20 seconds and then releasing it.
Part 2: Configuring your WDS Network
So, you should now have four routers with Tomato Firmware on it (at the time of writing we used Tomato 1.28). You'll need to configure the routers to talk with each other for the WDS network to work. The instructions I followed are located here.
Pre-configuration notes/hints:
- You may want to print the Google Spreadsheet so you can use it to write down the passwords and MAC Addresses.
- You will need to know the MAC Address of the wireless network of each router. You will see I point this out in the instructions below (it can be found in "Basic > Network > Wireless > MAC Address"). It can save you time if you obtain all of the MAC addresses before you begin.
- It can also save you time if you choose how you are going to setup the routers before you begin AND then label the routers.
- You can set everything up in your house before you do it at the church if you want (although YOU MUST make sure you pick a wireless channel that DOES NOT interfere with other wireless routers in your neighborhood. If you pick a wireless channel that is already being used, this won't work that well)
- During configuration, you may be plugged into one of the routers but DHCP is turned off AND that router may be mis-configured (or another router might be misconfigured since you are using WDS and manually linking the routers with the "Link With" setting) so your computer won't get an IP address and thus won't be able to talk to the router unless you 1) RESET the router or 2) Manually set your IP Address.
- I mention this because I fat fingered the MAC address on one of the routers and mis-configured the other ones because of this so that router wasn't talking to the main router. It took me awhile to figure out that I had the wrong MAC address. Hence this warning... if things aren't working, triple check your mac addresses.
- Always start by configuring the main router first, then test it to make sure it is working. Then add one router that it is linked to (Router #2 or #3 in my diagram). Then test that router to make sure it is working (plug in the ethernet cable to router #2, disable your wireless and go to www.google.com). Once you know that the second router is working, then add another router. Test each router as you add it (and if it doesn't work, try pinging the main router and re-verify settings).
- Decide where you are going to place your routers. I decided to put two of the routers in clerks' offices across the chapel, one in the materials center, and one in the cleaning/storage closet.
- Here is a visual picture of where we put the routers and how I configured them to talk to one another (the red lines with arrows show how each router is talking to one another)
- MAIN ROUTER that connects to the Internet (bottom left corner in my picture) - THIS ROUTER IS OUR MAIN ROUTER and is set up slightly differently then the others
- Basic > Identification > Name - set the name (e.g. RW Clerks' Office) > SAVE
- Administration > Set password to something you will remember (or write it down)
- Basic > Network:
- WAN/Internet
- Type: DHCP
- LAN
- Router IP Address: 10.0.2.1 (I'm using an IP address that doesn't conflict with the other IP addresses of the other routers/devices on the network. I chose ".1" because this is the main router for the WDS network)
- Subnet Mask: 255.255.255.0
- Static DNS: 0.0.0.0 (this tells the router to use it's own default gateway as the DNS Server)
- DHCP Server: CHECKED
- Start: default is 100
- End: default is 149
- Lease Time: default 120 minutes
- WINS: default 0.0.0.0
- Wireless
- Enable Wireless CHECKED
- MAC Address: write this down, for this example I'll just use 00:00:00:00:00:01 in the instructions, but you will need to know the MACs of your own routers.
- Wireless Mode: Access Point + WDS
- B/G Mode: G-Only (I chose G only to get this to work)
- SSID: RWWireless (pick something that makes sense for your building, I'm using "RWWireless" for these instructions
- Broadcast: CHECKED
- Channel: 8 (Pick a channel that IS NOT BEING USED and will NOT conflict with other devices in the area. Click the "Scan" button to have the router scan available channels)
- Security: WPA Personal
- Encryption: AES
- Shared Key: MyWirelessPassword (set a password. It needs to be at least 8 characters).
- WDS: Link With: (I want to manually tell this router to talk to Router #2 (which is the top left in my picture) and Router #3 (which is the bottom right in my picture)
- Type in the MAC Addresses of the other routers you want this to talk to (hence it is best to get the mac addresses of each router before starting).
- Since I only want this router talking to two other routers, I only utilize two of the boxes.
- So, for instructional purposes, I would put the following in the link with boxes:
- 00:00:00:00:00:02
- 00:00:00:00:00:03
- By putting in the MAC addresses of Router #2 and Router #3, then this router will only communicate with those routers. (Router #4 we will configure to communicate with Router #2).
- Save! Test it! (try wired and wireless, make sure lds.org works)
- WAN/Internet
- ROUTER #2 (top left in my picture). This is set up similar to the first, except the WAN port we won't use and we will turn off DHCP (since Router #1 is handling that).
- Basic > Identification > Name - set the name (e.g. PR Clerks' Office) > SAVE
- Administration > Set password to something you will remember (or write it down)
- Basic > Network:
- WAN/Internet
- Type: Disabled
- LAN
- Router IP Address: 10.0.2.2
- Subnet Mask: 255.255.255.0
- Static DNS: 10.0.2.1 (this tells the router to use the main router)
- DHCP Server: NOT CHECKED
- Wireless
- Enable Wireless CHECKED
- MAC Address: write this down, for this example I'll just use 00:00:00:00:00:02 in the instructions, but you will need to know the MACs of your own routers.
- Wireless Mode: Access Point + WDS
- B/G Mode: G-Only (I chose G only to get this to work)
- SSID: RWWireless (this must be the same for all routers)
- Broadcast: CHECKED
- Channel: 8 (Same as router #1)
- Security: WPA Personal (Same as router #1)
- Encryption: AES(Same as router #1)
- Shared Key: MyWirelessPassword (Same as router #1)
- WDS: Link With: Since this is router #2, we tell it to talk to Router #1 and Router #4 (see my picture)
- 00:00:00:00:00:01
- 00:00:00:00:00:04
- Save! Test it (try wired first: does your computer get an IP Address? Can you go to google.com? can you ping the main router?).
- WAN/Internet
- ROUTER #3 (bottom right in my picture). This is almost exact same as #2, except the ip address is different and the "Link With" MAC address section is different.
- Basic > Identification > Name - set the name (e.g. Materials Center) > SAVE
- Administration > Set password to something you will remember (or write it down)
- Basic > Network:
- WAN/Internet
- Type: Disabled
- LAN
- Router IP Address: 10.0.2.3
- Static DNS: 10.0.2.1 (this tells the router to use the main router)
- DHCP Server: NOT CHECKED
- Wireless
- Enable Wireless CHECKED
- MAC Address: write this down, e.g.00:00:00:00:00:03.
- Wireless Mode: Access Point + WDS
- B/G Mode: G-Only
- SSID: RWWireless
- Broadcast: CHECKED
- Channel: 8 (Same as router #1)
- Security: WPA Personal (Same as router #1)
- Encryption: AES(Same as router #1)
- Shared Key: MyWirelessPassword (Same as router #1)
- WDS: Link With: Since this is router #3, we tell it to talk to Router #1
- 00:00:00:00:00:01
- Save! Test it! (does your computer get an ip address when connected to this router? can you ping the main router? can you go to google.com?)
- WAN/Internet
- ROUTER #4
- Basic > Identification > Name - set the name (e.g. Cleaning Closet) > SAVE
- Administration > Set password to something you will remember (or write it down)
- Make everything the same as Router #2 except the following:
- Basic > Network:
- WAN/Internet
- Type: same as Router 2 ("disabled")
- LAN
- Router IP Address: 10.0.2.4
- Static DNS: 10.0.2.1 (this tells the router to use the main router)
- DHCP Server: NOT CHECKED
- Wireless
- Enable Wireless CHECKED
- MAC Address: write this down, e.g.00:00:00:00:00:04.
- ... (everything should be the same as the other routers)
- WDS: Link With: Since this is router #3, we tell it to talk to Router #1
- 00:00:00:00:00:02
- Save! Test it!
- WAN/Internet